Welcome to my extremely wordy guide for completing the new Destiny 2: Curse of Osiris heroic strike; ‘A Garden World’. Both the written piece and video guide are focused on the most efficient route for completing the strike. Barring minor alterations (or possibly, yet uncovered glitches) is currently the fastest way to complete the strike. Hopefully then, the video and written guide will arm you with the information you need to expediently farm the strike or complete it without any major inconveniences. Additionally, this guide should be still be valid when the strike gets placed into the Nightfall rotation, when speed becomes a requirement for completion. I will endeavour to update if it is not.
The new heroic strike; A Garden World, is actually just the story mission that goes by the same name, with a few alterations tacked on and juiced up. That is to say, more majors, higher Light level requirement and more enemies in general. So if you can recall the ‘A Garden World’ story mission, you should already have a solid understanding of what needs to be done.
The video is there for people who want something a bit quicker to digest, but lighter on details. The written guide is for those that enjoy a deep dive into the strike’s details, characteristics, quirks and all that comes with it.
Step-by-Step Walkthrough
Mercury Overworld
You spawn in the Mercury overworld on the right side of the map (if you’re looking out from The Lighthouse). Like every strike, story mission or adventure set on Mercury, you need to head to the giant blue triangle portal that takes you to the Infinite Forest. You’ll be spawned in looking in the correct direction, so just press forward. There will be some enemies congregating around the entrance, ignore them and head into the portal. Once through, progress down the giant triangle tunnel to the next section, the ‘Infinite Forest’.
The Infinite Forest
The Lego Infinite Forest is Bungie’s attempt at making random terrain. Besides a few set pieces (namely the first and last), every piece between those two is variable. It is important to note, that the pieces themselves are not random (they’re prefabricated), but the order they appear in and how they connect changes. So basically, Lego pieces. Thus, it’s somewhat difficult to give exact directions on how to navigate the Infinite Forest.
Both of the new Curse of Osiris strikes (Tree of Probabilities and A Garden World) share the Infinite Forest segment. The difference between the two is the length; with Tree of Probabilities’ Infinite Forest segment being about twice as long to compensate for its shorter final section.
With all that being said, there is some general advice that will see you through any permutation of platforms with relative ease.
- Avoid combat. No enemies possess a trigger that prevents you from spawning in the next platforming section. That is to say, there are no Daemon’s (the enemies that make the doors unusable) that were present in the earlier Infinite Forest content. Protracted battles serve no purpose but to slow you down.
- Follow the twin parallel glowing white beams. Every random platform ends in a ‘door’ (their word, not mine) you must use. These doors emit two parallel white beams of light into the sky, use these to guide you to them. This lets you take some very expedient shortcuts if you know where to go. Sometimes the beams can be obscured by the terrain, if you don’t know where the door would be (it becomes more clear how the pieces fit together after doing it enough), try to gain altitude to help you spot it. Finally, there is a single white beam that is shooting into the sky, this is where you ultimately want to end up (the triangle portal), not where the next door is, try not to get baited by it like I do.
- Avoid following the waymarker. Generally the speaking the waymarker tries to guide you through ‘checkpoints’, which are, on occasion, in multiples per platform segment. Usually, this sends you a meandering and inefficient path, only follow these if you get lost.
- Don’t touch new platforms as they’re spawning in. Seriously, it’s an instant kill if you touch them at the wrong time. Too early and dead.
In summary, just parkour your way to the twin white beams of light and avoid fighting, this yields the fastest path through the Infinite Forest. Just head through the portal and proceed down the triangle tunnel onto the final section, the ‘The Garden World, Mercury’.
The Garden World, Mercury
Once you come out of the portal you’ll be in a simulation of Mercury before the Vex converted most of it. Which as an aside, looks pretty damn cool. This section of the strike has a lot of enemies in it. The good news is that outside of a select few, you can just zip past them all! Plenty to kill if that’s your shtick too, but ultimately a waste of time from an efficiency standpoint. Each section of this zone is it’s own little contained area in which the goal is to reach the jump pad to propel yourself to the next area. I’ve split this part of the guide into steps, with each step representing its own area, which usually culminates in a jump pad.
- First jump pad. After exiting the portal just run straight ahead until you see a lake of ‘Vex Milk’ (Radiolarian fluid) then turn left, the pad should be in plain sight a bit further down, jump on.
- Second jump pad. You’ll land on a small circular floating island with the jump pad tantalising close. It’s a trap! A block of terrain will materialise over it. A white impenetrable sphere (can’t shoot in, can’t shoot out) with a cube inside will spawn. Run into the sphere, shoot the cube and the block that is…blocking the pad will disappear.
- Third jump pad. You’ll land on another circular floating island. A bit to the right of it will be a long rectangular island, jump over to this and run lengthwise up it, scaling the giant steps as you go. Once again, the jump pad will be blocked, so repeat the process from earlier; enter sphere, destroy cube, go for a ride.
- Not a jump pad. When you land you’ll see a very big (but currently inactive) Minotaur a bit to the left. This Minotaur has a white shield (‘temporal shield’), thus it is invulnerable and will also activate soon after your arrival. Behind it is another sphere with a cube in it, enter the sphere, destroy the cube. After a couple of seconds the Minotaur’s shield will fizzle, kill the Minotaur. Follow the path to the left of where you first saw the Minotaur and another cube will present. This one was linked to the Minotaur, if the Minotaur died, the cube’s shield should have also go down, continue your war on cubes and a wall to the right will disappear revealing a cave entrance.
- Not a jump pad again. Follow the short path through the cave and you’ll come into a large semi-open area with some steps. Follow the path around to the left, doing an eventual U-turn. Once you’ve completed the U-turn you’ll see another sphere with a cube inside it, you know the drill. The wall on the right will open up, beckoning you down yet another path.
- The actual fourth jump pad. Follow the path and you’ll arrive back outside with a shielded Minotaur engaged in combat with some Cabal. Exact same process as the previous Minotaur; destroy cube, destroy Minotaur, destroy the final cube, no bamboozle though. Jump pad ahoy!
- The fifth jump pad. You’ll arrive in the floating tower at the centre of the zone. Follow the path around and up the ramp. Eventually you’ll be greeted by a large amount of Precursor Vex sitting on the ramp. Run past or deal with them it’s up to you, at the top of the ramp will be the jump pad, no need to destroy a cube for this one.
- The sixth jump pad. This room is a bit more tricky than the rest. There is a lot of raised platforms with Hobgoblins perched on them, plus a cavalcade of Vex hanging about. If you’re the cautious type I’d recommend just clearing out this room as speeding through it can be very dicey. Make your way (via murder or speed) around the room and you’ll see another Minotaur-cube combo.I prefer to run to the jump pad and use the block for cover, backdooring the Minotaur-cube combo (that’s my style). Do the usual and the jump pad will open up.
- The seventh jump pad. You’ll be flung into a room with a robust number of Vex all huddled together. You need to head around to the left. There is a very convenient shortcut however, complete with cover. When you land in here, look to your left there is a gap over the centre of the tower you can just jump over and terrain blocks most of the shots from the Vex. Once you jump over, head up the stairs, to the right and jump on.
- The eighth and final jump pad. You’ll be launched to a lonely floating island with nothing but a jump pad on it. This one isn’t a puzzler. On to the boss encounter.
The Boss Battle – Walkthrough
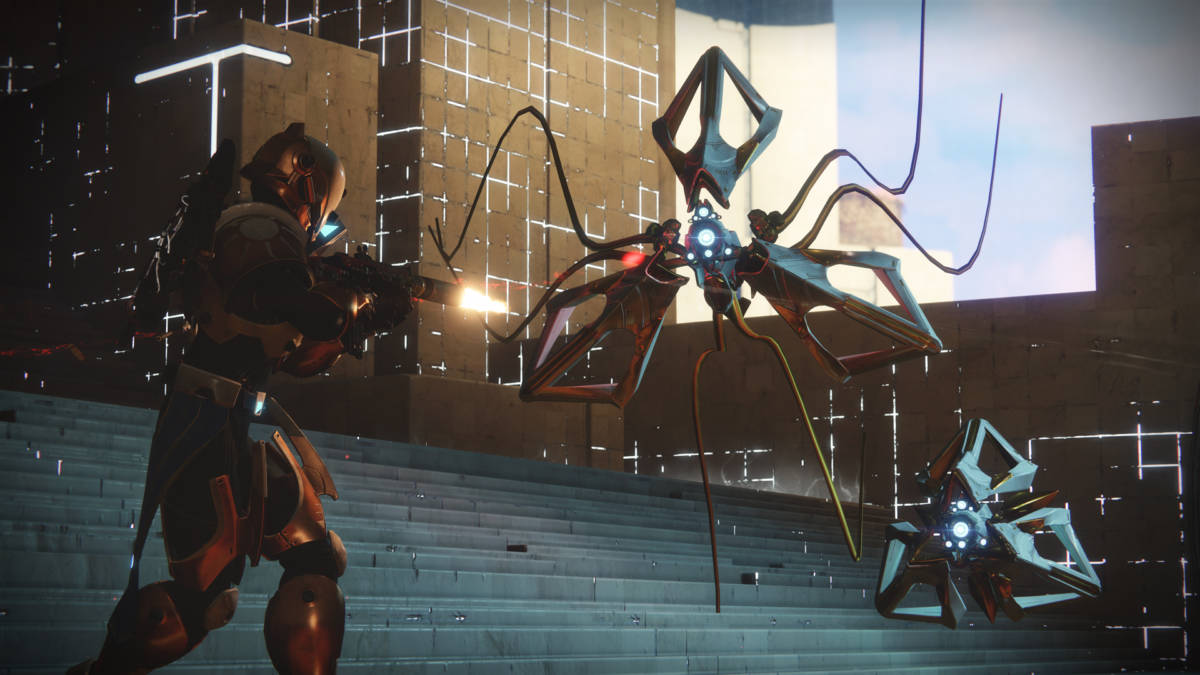
After you’ve finished your human cannonball impression, shoot the cube hovering above the centre of the platform to start the fight. This begins the fight again Dendron, Root Mind. He is momentarily invulnerable while he reacts to having his favourite – and final – cube slain.
Soon as the fight begins adds (additional enemies) will begin coming out of the four Vex gates evenly spaced throughout the room. Dendron itself will fire his purple beam and dark purple sphere attacks, described in the section below. The goal is to keep the adds under control while landing damage on Dendron. Dendron will periodically materialise new cover in and dematerialise the old cover out, coupled with adds coming in from multiple directions means finding a spot to recharge your shields can be tricky at times.
When Dendron is dropped to about ¾ HP, he’ll start rotating counterclockwise around the arena. If his HP is still high enough he’ll stop 1/3rd through a full circle (120 degrees) and continue with his standard tactics of firing his beam and sphere. When dropped to a bit above ⅔ HP, he’ll do another 1/3rd rotation in the same direction. Dendron will become invulnerable (yay temporal shields) and activate two of the four shielded Minotaurs around the room. These function the same as every shield Minotaur-cube pair you’ve encountered on this strike. Enter the sphere, destroy the cube, destroy the Minotaur. When both cubes are destroyed Dendron will be stunned for roughly five to six seconds (the stun is linked to the cubes, not the Minotaurs).
The fight now just loops back to the first phase, with Dendron eventually ending up another 240 degrees away and becoming invulnerable a bit above ⅓ HP. He’ll activate the final two shielded Minotaurs, handle them the same way you did earlier. Once the final two cubes are destroyed, Dendron will repeat the same tactics it’s been using all fight until it dies. Finish it off and collect your loot. Possibly push his corpse around too, that’s kind of fun.
The Boss Battle – Mechanics
These are all the mechanics involved in the fight (basically all the things that try to kill you). Dendron’s weak-point is the same as a Vex Cyclops: the purple iris. The following are Dendron, Root Mind’s mechanics listed out:
- Purple laser beam. This is Dendron’s standard attack and truthfully it’s fairly dangerous. As all AI aim for your centre chest at the point of firing (that is, they don’t lead), they normally have horrendous accuracy due to majority of enemies carrying projectile weapons. Dendron’s beam is instant, thus he is surprisingly accurate. A single hit from the beam isn’t devastating, but if you continue to disrespect it by standing out in the open he is capable of killing you and making you feel dumb about it.
- Dark purple slow sphere. Dendron momentarily charges up a large dark purple sphere from his iris. The sphere is legendarily slow and easy to avoid, combined with how long it takes to charge it you’d have to be seriously pre-occupied to be hit by this. If it does hit you, it will do a hefty sum of damage and apply the ‘slowed’ status effect to you.
- Terrain manipulation. Sounds fancy, but it isn’t. It’s the same technique used by ‘The Pyramidion’s’ final boss. He’ll simply materialise new cover in and dematerialise the old cover out. It can be quite annoying due to the amount of adds coming from different angles and with the accuracy with its main attack. You can somewhat ignore if you just take cover by one of the gates outside of his line-of-sight, as he only performs this magic trick on the blocks in the middle.
- Moves. Sounds odd to add, but due to his ‘unique’ position and form of movement it deserves a mention. Dendron appears to only rotate counterclockwise around the outside of the arena on his special platform. Furthermore he appears to only move in sets of two before phasing. Each movement phase is 120 degrees or 1/3rd of a circle (Vex do loves threes and triangles). Thus, he’ll always end up between two vex gates. Finally, he only begins movement based on certain HP thresholds. His invulnerability phases seem to be linked to it finishing those two movements described above.
- Invulnerability and Minotaur support. His final trick is to summon a ‘temporal shield’ (aka the unbreakable white shield, or ‘Pally Bubble’) and activate two of the four sleeping shield Minotaurs around the room. Exactly like earlier in the strike, simply enter the sphere, destroy the cube and then the Minotaur. Destroying both cubes (not Minotaurs) will stun Dendron. Other than that, you don’t need to kill the Minotaurs, but as they are the energy grenade launcher type (purple missile things); ignore at your own peril.
The final mechanic is adds (additional enemies). Truthfully this is probably the most difficult ‘mechanic’ as he’s relentless when it comes to calling for backup. Beginning with fairly easily to handle Goblins, but eventually Hobgoblins and Harpies get added to the mix when his HP gets low enough. Hobgoblins are the most threatening and should be kept under control, Harpies and Goblins can be somewhat ignored if you’re confident. Add control is the name of the game here, Dendron itself isn’t particularly threatening if you show his laser the respect it deserves.
As a final oddity, Dendron’s critical hit multiplier (yellow damage) seems to be in effect 100% of the time when you hit his eye, even when not in ADS. This seems entirely unique to it as all other enemies hit on their weak-point from the hip tend to be random about awarding critical yellow damage (on top of the weak-point multiplier).
Final Thoughts
Ultimately, the strike is fairly quick and easy as long as you aren’t compelled by the urge to kill everything. If you engage in every battle, you’ll likely double the length of the strike. The enemies aren’t threatening enough to stop you from sprinting through and there is so much terrain blocking line of sight that they struggle to hit you anyway. The boss fight itself is a bit of a pushover especially when you compare it something like Savathûn (man screw that guy). I personally expect the Nightfall versions of the new DLC strikes to be absolute pushovers when compared to Destiny 2’s vanilla strikes.
If you liked this guide, be sure to check out our other guide for the Tree of Probabilities Strike.
Some of the coverage you find on Cultured Vultures contains affiliate links, which provide us with small commissions based on purchases made from visiting our site.