
Rage 2 has been out for the past week, and while it hasn’t exactly set the world on fire, it’s still great fun. id Software and Avalanche Studios’ combination of superlative shooting and packed sandbox filled with objectives is a welcome one, but the wealth of content can feel like your typical sandbox checklist, and the first hour or so can be overwhelming.
After a brief tutorial section, the world map opens up and the game tells you that you can go wherever you like, which can be a bit daunting during the first half hour of the game. With that in mind, we’ve put a little step-by-step guide of where to go and what to do that should make the first couple of hours easier for you.
Step 1 – Supermassive Vortex Powers
After the tutorial, where you gain your first Ranger power and vehicle, your friend Lily gives you three main objectives that’ll help with the revival of Project Dagger, the final plan to eliminate the villainous Authority once and for all. While you should go deal with that at some point, ignore those instructions completely for now.
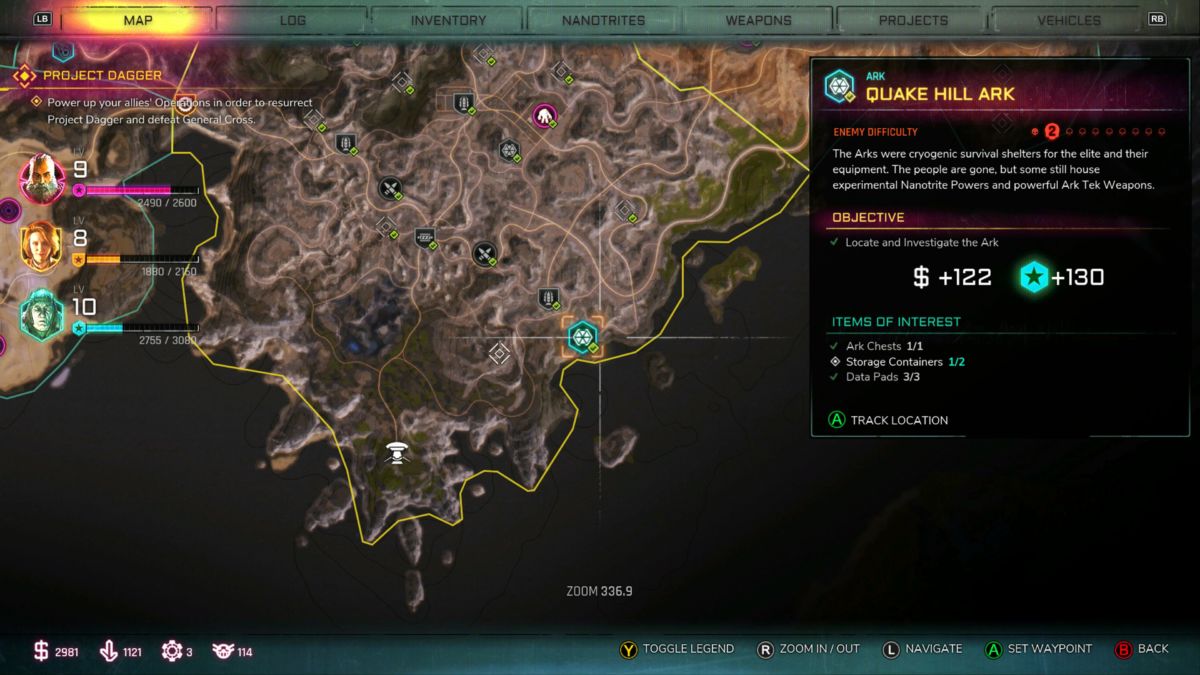
Instead, you’ll want to head east to the Quake Hill Ark, which isn’t immediately shown on the World Map but we’ve included it in the screenshot above. The Arks in Rage 2 all contain either powers or weapons that’ll make your journey through the post-apocalypse much easier, and the Ark in question contains the invaluable Vortex ability.
The Vortex traps and incapacitates enemies in a swirling Black Hole of death, making hectic fights much more manageable. It’s a brilliant ability, and one that’s worth upgrading as quickly as possible. During my playthrough, I only found about this Ark about halfway through the game, but you can head there right from the start. Learn from my mistake, get yourself a Vortex.
Step 2 – Triple-A (The A is for Ark)
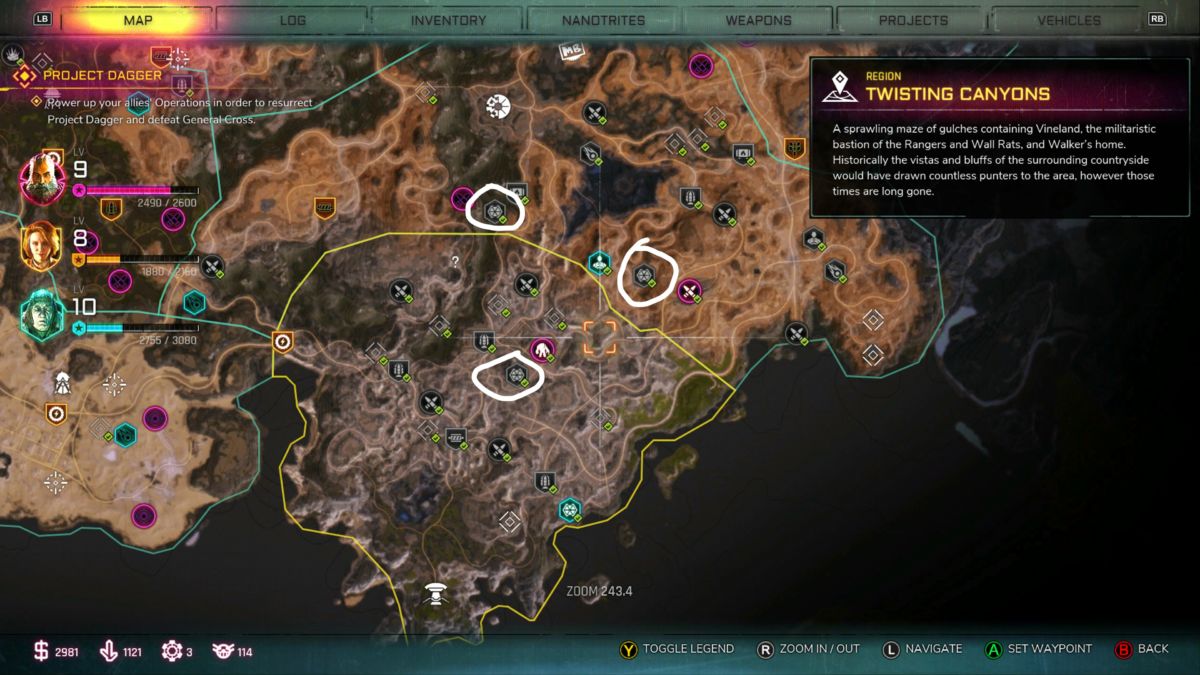
With Vortex in hand, you should now follow Lily’s advice and make your way towards the John Marshall objective in Gunbarrel. Mostly, anyway. Unlike the Quake Hill Ark, your journey from Vineland to Marshall is dotted with another three conveniently placed Arks, and they’re just as necessary as Vortex. You’ll likely pick them up anyway, as you head to Gunbarrel, but consider this our official endorsement to do so.
The Arks we’re referring to here are located at Junker’s Pass, Great Crack and Canyon Cove. Junker’s Pass unlocks the Shatter ability, a powerful melee attack that’s perfect for stripping armour or just smacking people across the wasteland, while Great Crack rewards you with a powerful Grav-Jump, which makes exploration and enemy flanking much easier.
The last “essential” Ark, Canyon Cove, is perhaps the most important, as it unlocks the Defibrillator. It’s a bit out of the way when journeying from Vineland to Gunbarrel, but the ability to revive yourself after being downed in a fight is always handy. Just don’t rely on it too much, there is a cooldown timer after all. There’s nothing worse than running gung-ho into a firefight only to get humbled immediately.
Step 3 – The Beginning Is The Middle

Alright, Step 3 is what the game wants to be Step 1. You need to head to Gunbarrel, speak with John Marshall and finish his mission before anything else. You can tackle the various bandit outposts and objectives strewn around the landscape in between, but your main focus should be completing the mission Blackout.
Once you speak to John, he tasks you with venturing into the sewers to clear out a mutant infestation, and finishing this mission has two immediate benefits. Firstly, through the process of the mission, you’ll unlock the Combat Shotgun, which is absolutely vital when dealing with mutants, or for stripping away the armour of The Shrouded, a powerful faction you’ll encounter
later on. The sooner you have the shotgun, the better, essentially.
Secondly, once you’ve completed Blackout, you’ll unlock the Kill & Destroy Project. Projects in Rage 2 are like skill trees, and the Kill & Destroy tree beefs up the Ranger’s combat efficiency by using Project Points. If you’ve made a beeline for Gunbarrel, you won’t have many Project Points at all, but it’s worth unlocking this tree first.
Step 4 – Walker, World Ranger

After completing Marshall’s first mission in Gunbarrel, the next logical step is to travel to the major towns in the game, Wellspring and Lagooney. This will give you fast travel options that’ll make exploring the world of Rage 2 much easier, especially when you’re backtracking between objectives. One of the most annoying parts about the Quake Hill Ark is there’s no nearby fast travel area, so it’s important and time-saving to grab it just after the game starts considering you spawn nearby.
Plus, travelling to these towns is required for the sake of the other introductory story missions where you meet the final two members of Project Dagger, Loosum Hagar and Dr. Anton Kvasir. Kvasir even has his own outpost that’s its own fast travel point. These missions then require you to trek across the world to complete their objectives, so it’s useful those fast travel options available to you to make exploring the world much quicker. Heading from Kvasir’s lab to the Eden Space Center for his Ground Control mission crosses the length of the World Map, so it’s easier when you can just warp to Gunbarrel and go from there.
There are other towns, such as Oasis in the South-West, and Dreadwood in the North, and these two towns are vital to unlocking the Wasteland Vagabond achievement/trophy. Dreadwood is an important base camp when tackling late-game missions, while Oasis is surrounded by side objectives that are great for levelling up your character. They’re more optional for Step 4’s purposes, but just know they’re there.
Step 5 – Social Butterfly

This also works during Step 3, but when you’re visiting the different towns, this step is always useful. As you wander around these trading outposts, you’ll find plenty of people with things to say. They’ll always be marked with a little icon above their heads, so you know who you’re looking for. When you first venture into an area, you need to talk to these people.
Though you might not want to sit through their dialogue, and you don’t have to considering there’s a skip conversation button, they reveal details about various freeroam objectives that can be found in the world to you. Maybe there’s a roadblock set up in the West, or they’ve heard rumours of an undiscovered Ark somewhere in the world, and these objectives will then be marked on your map.
What’s even better is that you can go back to these civilians once you’ve visited the area they’re referring to, telling them you’ve taken care of things. In some cases, like when you’ve been told about a bandit den, returning to the civilian who mentioned it after you’ve wiped out the bandits can reward you with cash or other items. It’s worth talking to everyone you see, basically.
Step 6 – Two Sweeps
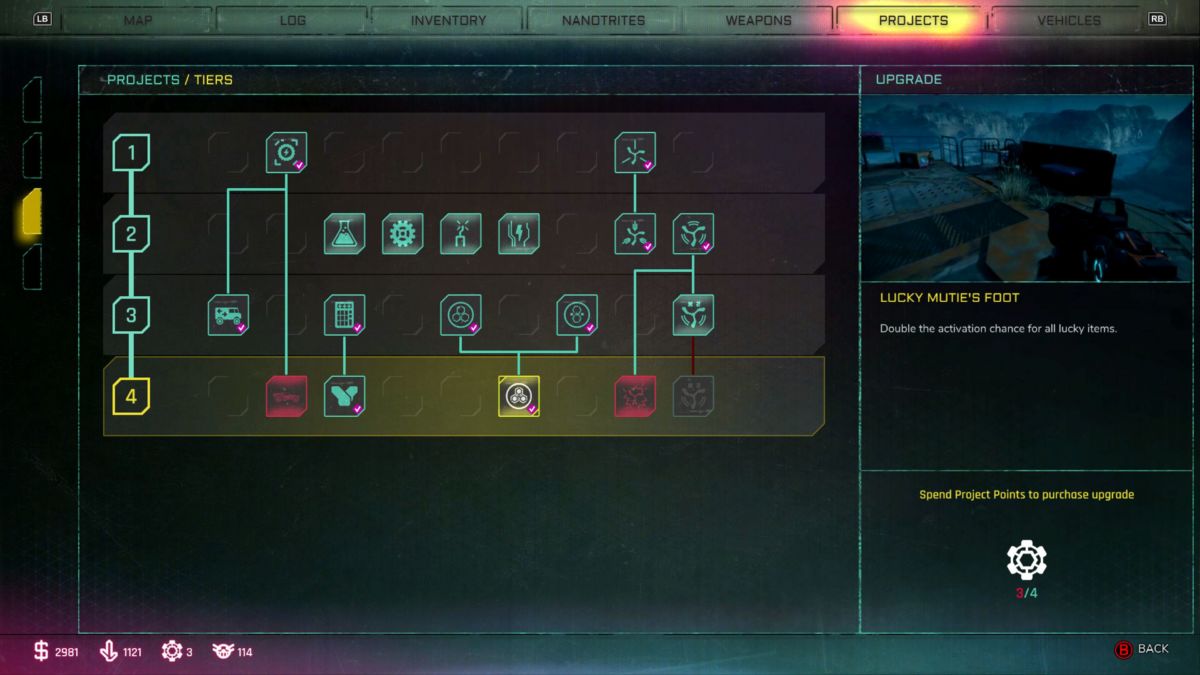
We haven’t really spoken about how to approach the vast amount of freeroam objectives found in Rage 2 yet, but they’re incredibly important to how you progress and level up. There’s 3 kinds of objective types, each tied to its own Project: Yellow is Capture & Control, Pink is Kill & Destroy while Blue is Search & Recover. Completing an objective of one type grants EXP in that Project, and levelling up awards Project Points.
We mentioned earlier that you have to complete Marshall’s first mission in order to buy upgrades from his Kill & Destroy Project tree, and the same is true for Hagar’s Capture & Control and Kvasir’s Search & Recover, but completing freeroam objectives will still grant Project Points even before you unlock the skill tree.
These objectives also contain a vast amount of Storage Containers, which offer vast amounts of cash and Feltrite. While cash is self-explanatory, and always useful, Feltrite is used to upgrade your Ranger abilities and weapons, allowing you to take less damage, do more damage with your abilities, dash quicker and more. The more Feltrite you have, the better, so let’s game the system a little bit.
The Capture & Control Project Tree has three skills that increase the odds of you getting 25% more Feltrite from Storage Containers, which we don’t need to tell you is an incredibly handy skill to have. Opening these containers isn’t necessary to completing an objective and getting the Project Points though, so you could easily complete enough objectives until you earn the Points needed to unlock those skills, before circling back around and reaping the rewards of the increased cash and Feltrite.
You only need 16 points to unlock those three skills, which is the equivalent of six Project level-ups. Those level-ups are handed out like sweets in the early going, so if you’re careful and put aside enough for those key skills, you’ll be rolling in that sweet, sweet post-apocalyptic currency before you know it.
As we said, these are some tips that should get you started, but do you have any other pearls of wisdom about Rage 2 that you’d like to share? Let us know in the comments below.
Some of the coverage you find on Cultured Vultures contains affiliate links, which provide us with small commissions based on purchases made from visiting our site.